

Homelab | 架构设计与实现-Low-level design---Proxmox
shunagliu008 2023-06-25 10:26:18 +08:00 1966 次点击这是一个创建 921 天前的主题,其中的信息可能已经有所发展或是发生改变。
一 介绍
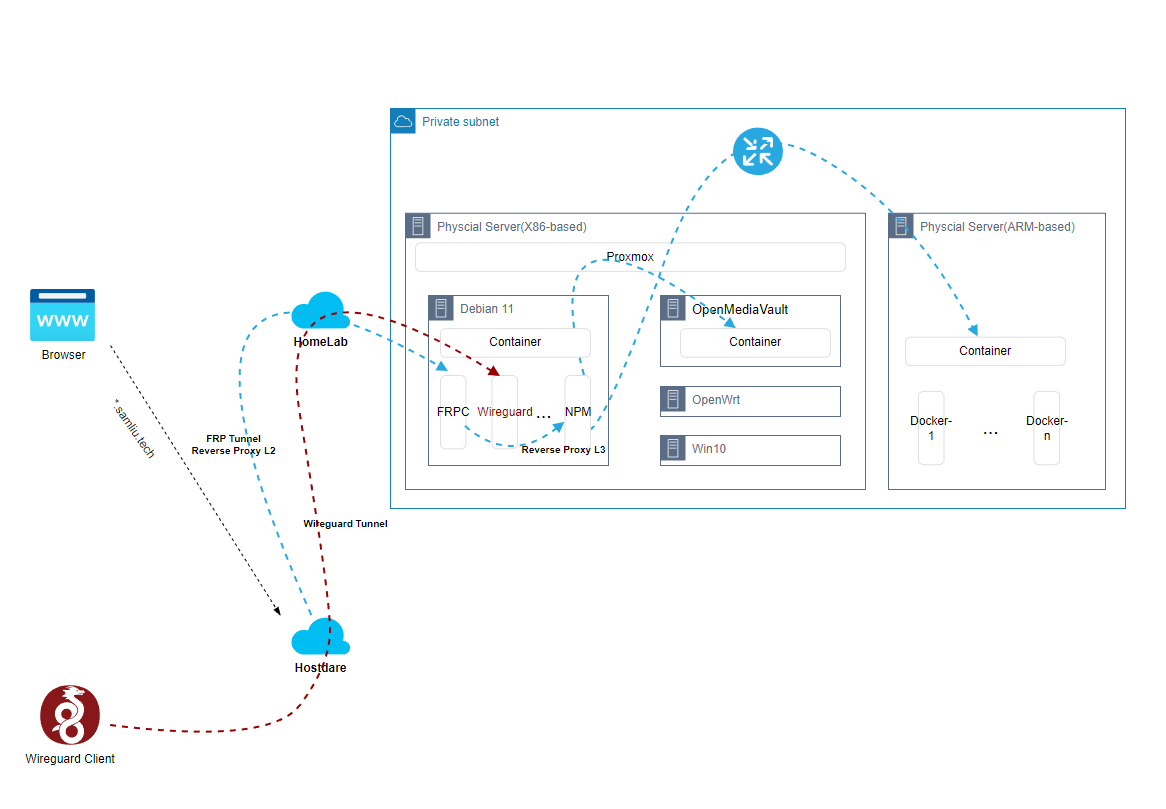
关于 “架构设计与实现-High-level design”篇章里,云下部分,本地环境的实现包括 Proxmox 及其数个不同功能的 VM ,以及 VM 内的众多不同功能的 Docker 。
如下:
- Proxmox ,安装及配置等等,功能众多而杂,可以类比 Vsphere
- Debian VM ,这里作为主力 Linux 使用,有点 Ubuntu 的稳定版分支的意思,适合做生产环境下的系统
- OpenMediaVault,一个开源轻量的 NAS 系统
- OpenWrt,作为代理服务,供其他服务使用,非透明代理
- Win10 ,一个图形化的工作台
- 一个树莓派,裸机运行,跑了多个 ARM 架构的 Docker 应用
二 部署
1 Proxmox ,安装及配置
安装后,让能跑起来还是比较简单,这里说明下 网络相关的配置,以我的环境为例,我是使用 wireless 连接网络。 Proxmox 7 (Debian 11 Bullseye) How to setup WiFi network
root@pve01:~# cat /etc/network/interfaces # network interface settings; autogenerated # Please do NOT modify this file directly, unless you know what # you're doing. # # If you want to manage parts of the network configuration manually, # please utilize the 'source' or 'source-directory' directives to do # so. # PVE will preserve these directives, but will NOT read its network # configuration from sourced files, so do not attempt to move any of # the PVE managed interfaces into external files! auto lo iface lo inet loopback iface enp1s0 inet manual auto wlp0s20f3 iface wlp0s20f3 inet dhcp wpa-conf /etc/wpa_supplicant/wpa_supplicant.conf auto vmbr0 iface vmbr0 inet static address 192.168.88.78/24 bridge-ports enp1s0 bridge-stp off bridge-fd 0 auto vmbr999 iface vmbr999 inet static address 100.64.0.100/10 bridge-ports none bridge-stp off bridge-fd 0 #100.64.0.0~100.127.255.255 post-up echo 1 > /proc/sys/net/ipv4/ip_forward post-up iptables -P INPUT ACCEPT post-up iptables -P FORWARD ACCEPT post-up iptables -t nat -A POSTROUTING -s '100.64.0.0/10' -o wlp0s20f3 -j MASQUERADE post-down iptables -t nat -D POSTROUTING -s '100.64.0.0/10' -o wlp0s20f3 -j MASQUERADE post-up iptables -t nat -A POSTROUTING -s '192.168.88.0/24' -o wlp0s20f3 -j MASQUERADE post-down iptables -t nat -D POSTROUTING -s '192.168.88.0/24' -o wlp0s20f3 -j MASQUERADE #post-up iptables -t nat -A PREROUTING -d 10.0.0.111 -j DNAT --to-destination 100.64.0.111 #post-up iptables -t nat -A PREROUTING -d 10.0.0.1 -j DNAT --to-destination 100.64.0.1 #post-up iptables -t nat -A PREROUTING -d 10.0.0.2 -j DNAT --to-destination 100.64.0.2 #post-up iptables -t nat -A PREROUTING -d 10.0.0.3 -j DNAT --to-destination 100.64.0.3 #post-up iptables -t nat -A PREROUTING -d 10.0.0.10 -j DNAT --to-destination 100.64.0.10 #post-down iptables -t nat -A PREROUTING -d 10.0.0.111 -j DNAT --to-destination 100.64.0.111 #post-down iptables -t nat -A PREROUTING -d 10.0.0.1 -j DNAT --to-destination 100.64.0.1 #post-down iptables -t nat -A PREROUTING -d 10.0.0.2 -j DNAT --to-destination 100.64.0.2 #post-down iptables -t nat -A PREROUTING -d 10.0.0.3 -j DNAT --to-destination 100.64.0.3 #post-down iptables -t nat -A PREROUTING -d 10.0.0.10 -j DNAT --to-destination 100.64.0.10 post-up iptables -t nat -A PREROUTING -i wlp0s20f3 -p tcp --dport 3389 -j DNAT --to 100.64.0.111:3389 post-down iptables -t nat -D PREROUTING -i wlp0s20f3 -p tcp --dport 3389 -j DNAT --to 100.64.0.111:3389 post-up iptables -t nat -A PREROUTING -i wlp0s20f3 -p tcp --dport 445 -j DNAT --to 100.64.0.2:445 post-down iptables -t nat -D PREROUTING -i wlp0s20f3 -p tcp --dport 445 -j DNAT --to 100.64.0.2:445 [scode type="blue"]配置逻辑:
- 无线网卡 wlp0s20f3 作为网关,通过前面配置的 wpa_supplicant 服务,连接家里 WiFi 网络
- 有线网卡是 enp1s0 ,桥接到 vmbr0 虚拟交换机
- 另一个虚拟交换机 vmbr999 ,用于连接其他 VM 网卡
- 其他虚拟网络网段配置源 NAT ,用于访问互联网
- 配置针对无线网卡 wlp0s20f3 的 NAT Server ,用于从外部网络方便直接访问 VM
[/scode]
2 Debian VM
这个 VM 是主力 Linux 系统,有几个重要的应用,docker 安装的
- FRP Client ,用于连接到云上主机,建立 FRP tunnel ,充当二级反向代理
docker run --restart=always --network host -d -v /root/frpc_free_terminal.ini:/etc/frp/frpc.ini --name mele3q_frpc_free_terminal snowdreamtech/frpc sam@debian:~$ more frpc_free.ini [common] server_addr = xxx.samliu.tech server_port = 1234 token = xxxxxooooo # 穿透需要 Web 访问的内网服务,例如群晖 NAS DSM 的管理界面. [*.samliu.tech] type = http local_ip = 100.64.0.2 local_port = 80 custom_domains = *.samliu.tech subdomain = blog [Wireguard] type = udp local_ip = 100.64.0.3 local_port = 51820 remote_port = 9853 - Nginx Management Proxy(NPM),充当三级反向代理,转发到真正的后端服务
version: "3" services: app: image: 'jc21/nginx-proxy-manager:latest' restart: unless-stopped ports: # These ports are in format <host-port>:<container-port> - '80:80' # Public HTTP Port - '443:443' # Public HTTPS Port - '81:81' # Admin Web Port # Add any other Stream port you want to expose # - '21:21' # FTP # Uncomment the next line if you uncomment anything in the section # environment: # Uncomment this if you want to change the location of # the SQLite DB file within the container # DB_SQLITE_FILE: "/data/database.sqlite" # Uncomment this if IPv6 is not enabled on your host # DISABLE_IPV6: 'true' volumes: - ./data:/data - ./letsencrypt:/etc/letsencrypt - Next-terminal, 基于 web 的设备管理平台,支持 RDP,SSH 等等
[post cid="1294" /]
version: '3.3' services: guacd: image: dushixiang/guacd:latest volumes: - /home/sam/next-terminal/data:/usr/local/next-terminal/data restart: always next-terminal: image: dushixiang/next-terminal:latest environment: DB: sqlite GUACD_HOSTNAME: guacd GUACD_PORT: 4822 ports: - "8088:8088" volumes: - /etc/localtime:/etc/localtime - /home/sam/next-terminal/data:/usr/local/next-terminal/data restart: always - Wireguard, 下一代 VPN 解决方案,支持 remote VPN 和 Site-to-site VPN,连接到内网,便于管理
version: "2.1" services: wireguard: image: lscr.io/linuxserver/wireguard:latest container_name: wireguard cap_add: - NET_ADMIN - SYS_MODULE environment: - PUID=1000 - PGID=1000 - TZ=Asia/Shanghai - SERVERURL=1.1.1.1 #optional - SERVERPORT=9853 #optional - PEERS=3 #optional - PEERDNS=114.114.114.114 #optional - INTERNAL_SUBNET=172.16.0.0/24 #optional - ALLOWEDIPS=100.64.0.0/10, 192.168.0.0/16, 172.16.0.0/12 #optional - PERSISTENTKEEPALIVE_PEERS=all #optional - LOG_COnFS=true #optional volumes: - /home/sam/wireguard-appdata/config:/config - /lib/modules:/lib/modules #optional ports: - 51820:51820/udp sysctls: - net.ipv4.conf.all.src_valid_mark=1 restart: unless-stopped 3 OpenMediaVault VM 安装
Install openmediavault on Proxmox
4 OpenWrt VM 安装
5 树莓派,裸机
ARM 架构的硬件,安装了众多的 Docker-based 应用,例如这个 Pi Dashboard https://pidashboard.samliu.tech/
三 其他 /引用
iGPU Passthrough to VM (Intel Integrted Graphics) https://3os.org/infrastructure/proxmox/gpu-passthrough/igpu-passthrough-to-vm/
How to Install Proxmox VE https://phoenixnap.com/kb/install-proxmox
目前尚无回复