

前贴
Hass-Panel
一个基于 React 的智能家居控制面板,基于 Home Assistant Websocket api 。
视频预览
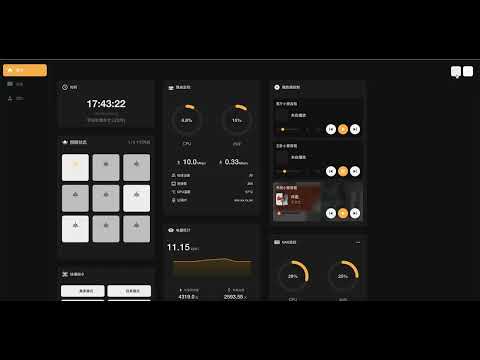
预览图

特性
- 响应式设计,支持移动端和桌面端
- 支持多种智能家居设备
- 灯光控制
- 空调控制
- 窗帘控制
- 传感器监控
- 摄像头查看
- 场景控制
- 更多设备支持中...
- 高度可配置,自由拖拽布局,支持移动端和桌面端
- 美观的用户界面,支持暗色模式
快速开始
配置
项目使用外部配置文件方式,可以在不重新构建的情况下修改配置。
-
复制示例配置文件:
# 克隆项目 git clone https://github.com/mrtian2016/hass-panel.git cd hass-panel cp public/config/userConfig.json.example public/config/userConfig.json -
根据您的 Home Assistant 环境编辑
userConfig.json
配置文件结构
配置文件包含以下主要部分(参考CONFIG.md):
天气
{ "weather": ["weather.your_weather_entity"] } 灯光
{ "lights": { "living_room": { "entity_id": "light.your_light_entity", "name": "客厅灯", "room": "living_room" } } } 传感器
{ "sensors": [ { "id": "LIVING_ROOM", "name": "客厅", "sensors": { "temperature": { "entity_id": "sensor.temperature_entity", "name": "温度", "icon": "mdiThermometer" }, "humidity": { "entity_id": "sensor.humidity_entity", "name": "湿度", "icon": "mdiWaterPercent" } } } ] } 空调
{ "climates": [ { "entity_id": "climate.ac_entity", "name": "客厅空调", "room": "living_room", "features": { "eco": { "entity_id": "switch.ac_eco_mode", "name": "节能", "icon": "mdiLeaf", "disableWhen": { "state": "off" } } } } ] } 窗帘
{ "curtains": [ { "entity_id": "cover.curtain_entity", "name": "客厅窗帘", "room": "living_room" } ] } 场景
{ "scripts": [ { "name": "离家模式", "entity_id": "script.away_mode", "icon": "log-out" } ] } 启动
# 修改 docker-compose.yml 中的 REACT_APP_HASS_URL 为你的 Home Assistant 实例地址, 然后启动 docker-compose up -d # 或者 docker run \ --name hass-panel \ --restart unless-stopped \ -p 5123:80 \ -e REACT_APP_HASS_URL=your-hass-instance:8123 \ -v "$(pwd)/public/media:/usr/share/nginx/html/static/media" \ -v "$(pwd)/public/config/userConfig.json:/usr/share/nginx/html/config/userConfig.json" \ -d \ ghcr.io/mrtian2016/hass-panel:latest 注意事项
- 配置文件必须是有效的 JSON 格式
- 所有的
entity_id必须与您的 Home Assistant 中的实体 ID 保持一致 - 只需要配置您需要使用的部分,未配置的部分将使用默认配置
- 修改配置后刷新页面即可生效
- 确保您的 Home Assistant 实体可以正常访问
常见问题
-
配置不生效
- 检查 JSON 格式是否正确
- 确认实体 ID 是否正确
- 刷新页面后重试
-
设备显示离线
- 检查 Home Assistant 连接是否正常
- 验证实体 ID 是否存在
- 确认设备是否在线
-
图标不显示
- 检查图标名称是否正确
- 确认使用了支持的图标
开发
# 安装依赖 npm install # 启动开发服务器 npm start # 构建生产版本 npm run build # 运行测试 npm test 贡献
欢迎提交 Pull Request 和 Issue !


