
- 自由线程( PEP 779 )特性已稳定支持。之前在 Python 3.13 中,这一特性需要显式指定编译选项。不过,全局解释器锁( GIL )依然是可选的,而是否要彻底移除 GIL 仍在讨论中( PEP 703 );
- 多解释器( PEP 734 )特性已支持。现在,可以在同一个进程中运行多个解释器,每个解释器都有独立的 GIL 。作为 Python 并行编程中减少对
multiprocessing依赖的又一步,还添加了InterpreterPoolExecutor来帮助管理多个解释器的并行; - 官方发布的 macOS 和 Windows 版二进制现已包含 实验性 的即时编译( JIT )器( PEP 744 )。该 JIT 编译器尚处于早期开发阶段,性能表现存在波动:启用后根据工作负载不同,可能产生 10% 的性能下降至 20% 的性能提升;
- 模板字符串( t-string ,PEP 750 )支持。这一功能主要是对 f-string 的补充,允许从类似字符串字面量的写法直接创建一个字符串模板对象;
- 增量式垃圾回收。循环垃圾回收器现在采用增量式处理。这意味着对于较大的堆内存,最大暂停( Stop The World )时间将减少一个数量级或更多;
- 交互式 Shell 支持语法高亮。除非显式禁用,否则从 Python 3.14 起,Python 交互式环境( RHEL )将默认在终端中渲染代码高亮。此外,Shell 还增加了对
import ___的自动补全; - asyncio 内省能力。可以使用
python -m asyncio <ps|pstree> <PID>功能来检查正在运行的异步 Python 程序的 async task 树。
更多可在这里看到: https://docs.python.org/zh-cn/3.14/whatsnew/3.14.html
]]>对于遵循 er 模型来构建视图数据的项目,fastapi-router-viz 可以为了解 api 返回类型间的关系提供快速,直接,可交互的图效果。
可以通过点击节点高亮全部上下游链路, 了解 pydantic class 的上下游依赖情况
alt 点击查看节点的源代码,或者直接在 vscode 中打开
根据 class + field name 来精准定位数据被哪些页面/ 接口使用
]]>我的网络是可以用 gemini cli 之类的,按理说应该不是网络问题啊。
简单测试代码如下:
import yfinance as yf import pandas as pd # 设置永辉超市的股票代码 ticker = "601933.SS" # .SS 表示上海证券交易所 # 创建 yfinance 对象 stock = yf.Ticker(ticker) # 获取实时价格(最新收盘价或当前价格,视市场情况而定) current_price = stock.history(period="1d")["Close"].iloc[-1] # 获取股票的详细信息(包括公司名称等) info = stock.info # 输出结果 print(f"永辉超市 ({ticker}) 的实时价格: {current_price:.2f} CNY") print(f"公司名称: {info.get('shortName', '未知')}") 运行就直接报错:
line 11, in <module> current_price = stock.history(period="1d")["Close"].iloc[-1] ^^^^^^^^^^^^^^^^^^^^^^^^^^ File "/opt/anaconda3/lib/python3.12/site-packages/yfinance/utils.py", line 103, in wrapper result = func(*args, **kwargs) ^^^^^^^^^^^^^^^^^^^^^ File "/opt/anaconda3/lib/python3.12/site-packages/yfinance/base.py", line 91, in history return self._lazy_load_price_history().history(*args, **kwargs) ^^^^^^^^^^^^^^^^^^^^^^^^^^^^^^^^^^^^^^^^^^^^^^^^^^^^^^^^ File "/opt/anaconda3/lib/python3.12/site-packages/yfinance/utils.py", line 103, in wrapper result = func(*args, **kwargs) ^^^^^^^^^^^^^^^^^^^^^ File "/opt/anaconda3/lib/python3.12/site-packages/yfinance/scrapers/history.py", line 178, in history data = get_fn( ^^^^^^^ File "/opt/anaconda3/lib/python3.12/site-packages/yfinance/utils.py", line 103, in wrapper result = func(*args, **kwargs) ^^^^^^^^^^^^^^^^^^^^^ File "/opt/anaconda3/lib/python3.12/site-packages/yfinance/data.py", line 364, in get return self._make_request(url, request_method = self._session.get, user_agent_headers=user_agent_headers, params= params, timeout=timeout) ^^^^^^^^^^^^^^^^^^^^^^^^^^^^^^^^^^^^^^^^^^^^^^^^^^^^^^^^^^^^^^^^^^^^^^^^^^^^^^^^^^^^^^^^^^^^^^^^^^^^^^^^^^ ^^^^^^^^^^^^^^^^^^^^^^^^ File "/opt/anaconda3/lib/python3.12/site-packages/yfinance/utils.py", line 103, in wrapper result = func(*args, **kwargs) ^^^^^^^^^^^^^^^^^^^^^ File "/opt/anaconda3/lib/python3.12/site-packages/yfinance/data.py", line 424, in _make_request raise YFRateLimitError() yfinance.exceptions.YFRateLimitError: Too Many Requests. Rate limited. Try after a while. 这要怎么解决呢,难道 yahoo 的 API 封这么严重啊。有没有知道怎么解决的老兄啊,感谢!
]]>例子:
class Demo: @app.task @classmethod def test(cls): pass schedule 注册任务: Demo.test- Python 自带的
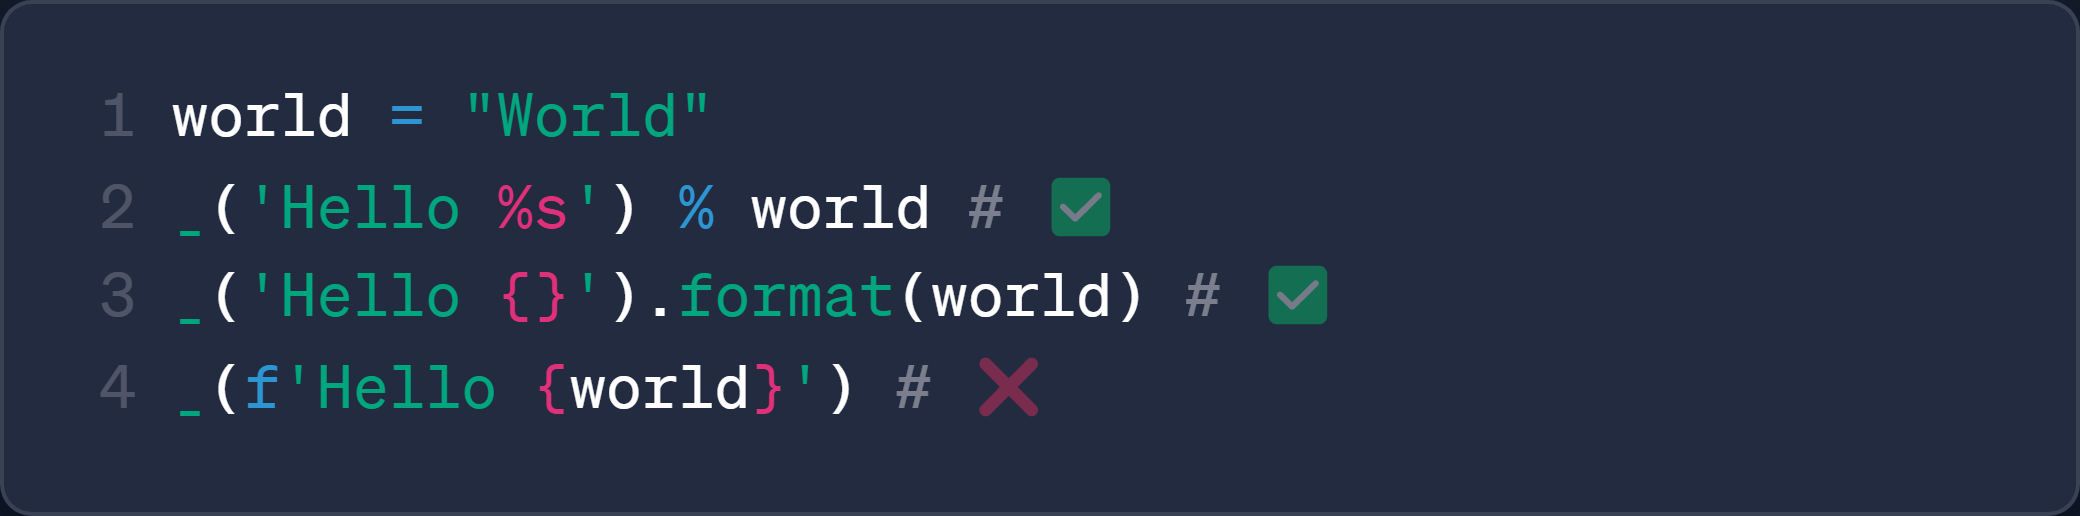
gettext不支持动态选择语言 (比如 Bot 需要根据用户选择语言) - 其他库需要手动维护翻译字典, 开发效率低
- 都不支持
f-string语法, 写起来不够优雅, 不够方便
所以, Easy AI18n 诞生了, 解决了以上所有痛点
Easy AI18n 是一个现代化的 Python3 国际化工具库,支持 AI 翻译、多用户场景以及完整的字符串格式化语法,让项目全球化变得更加优雅自然。
https://github.com/z-mio/easy-ai18n
特点
- 自动提取内容生成翻译字典, 提高开发效率
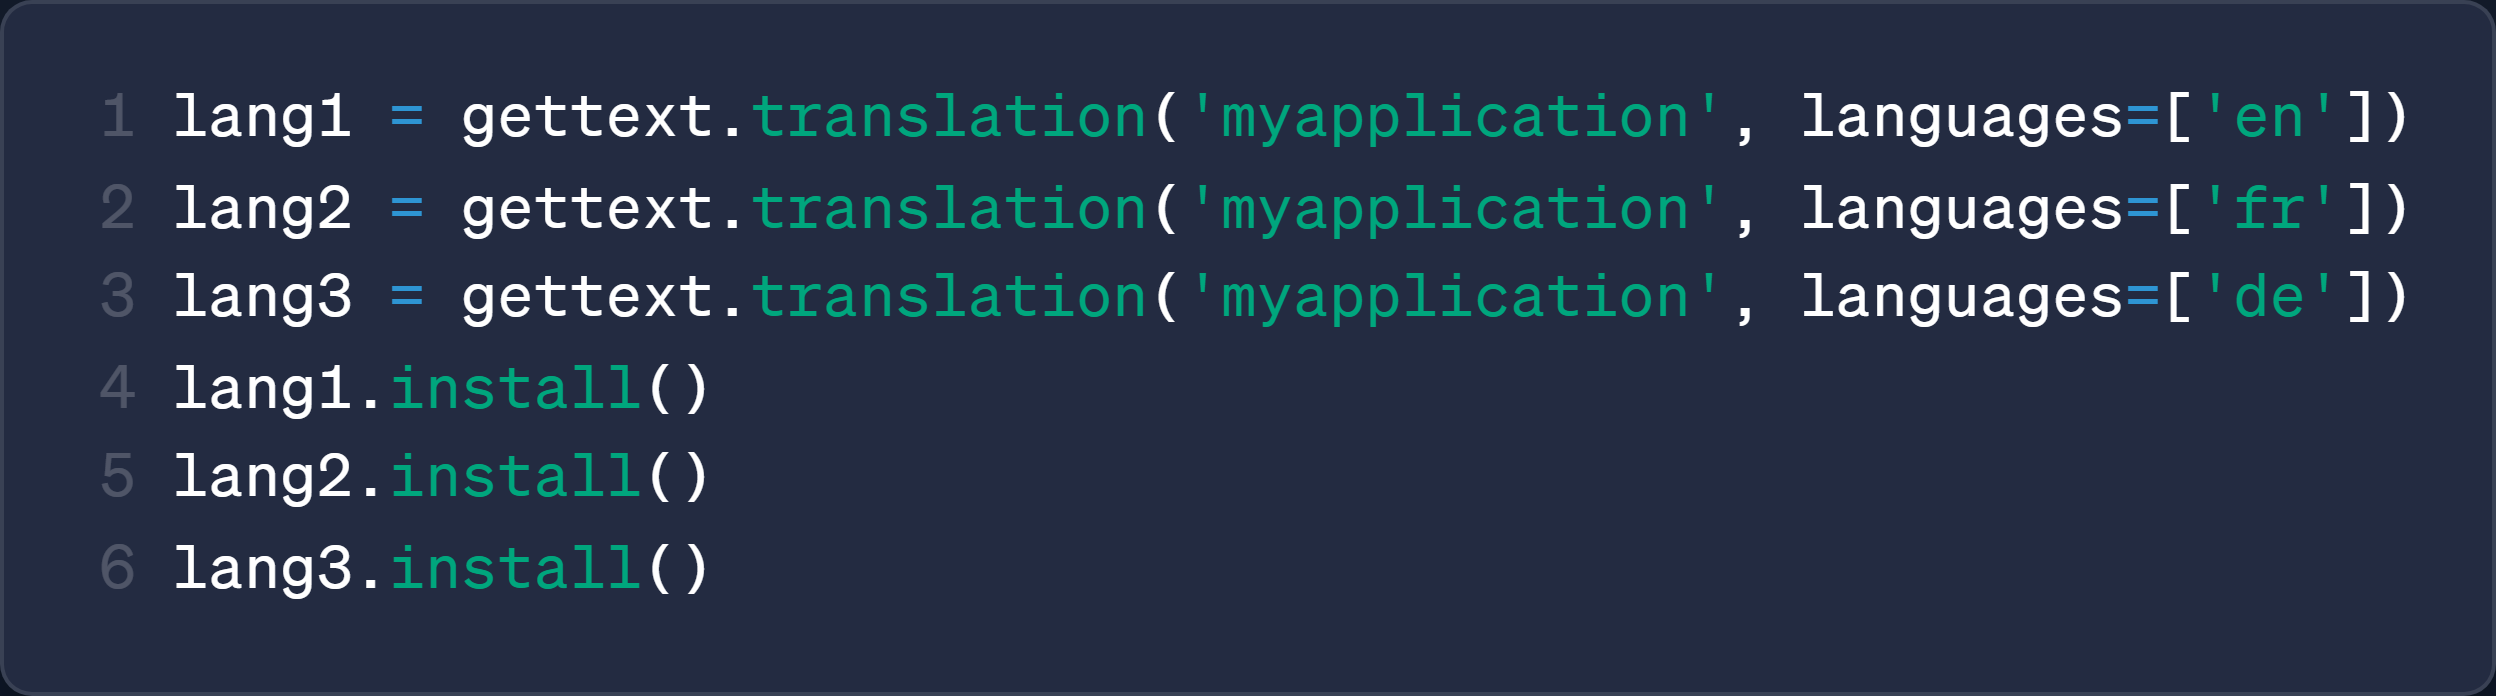
- 支持动态多语言, 适配多用户场景
- 支持所有格式化语法, 代码更优雅
- 支持 AI 翻译, 翻译质量更好
对比
| 其他 i18n 工具 | EasyAI18n |
|---|---|
 需手动维护翻译字典, 开发效率低 需手动维护翻译字典, 开发效率低 |  自动提取翻译内容,无需手动维护文件 自动提取翻译内容,无需手动维护文件 |
 仅支持部分格式化语法 仅支持部分格式化语法 | 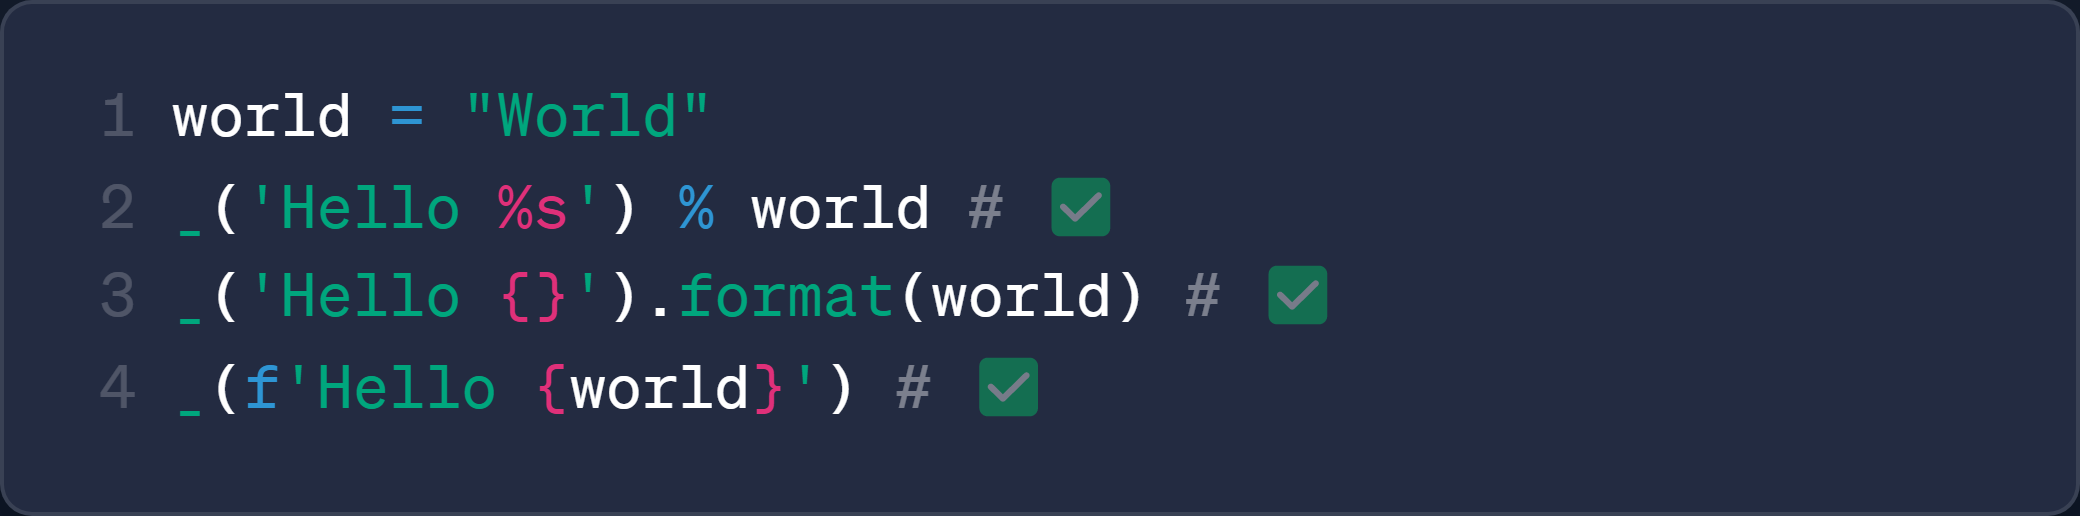 完全支持所有格式化语法 完全支持所有格式化语法 |
 不支持实时多语言切换,不适用于多用户场景 不支持实时多语言切换,不适用于多用户场景 | 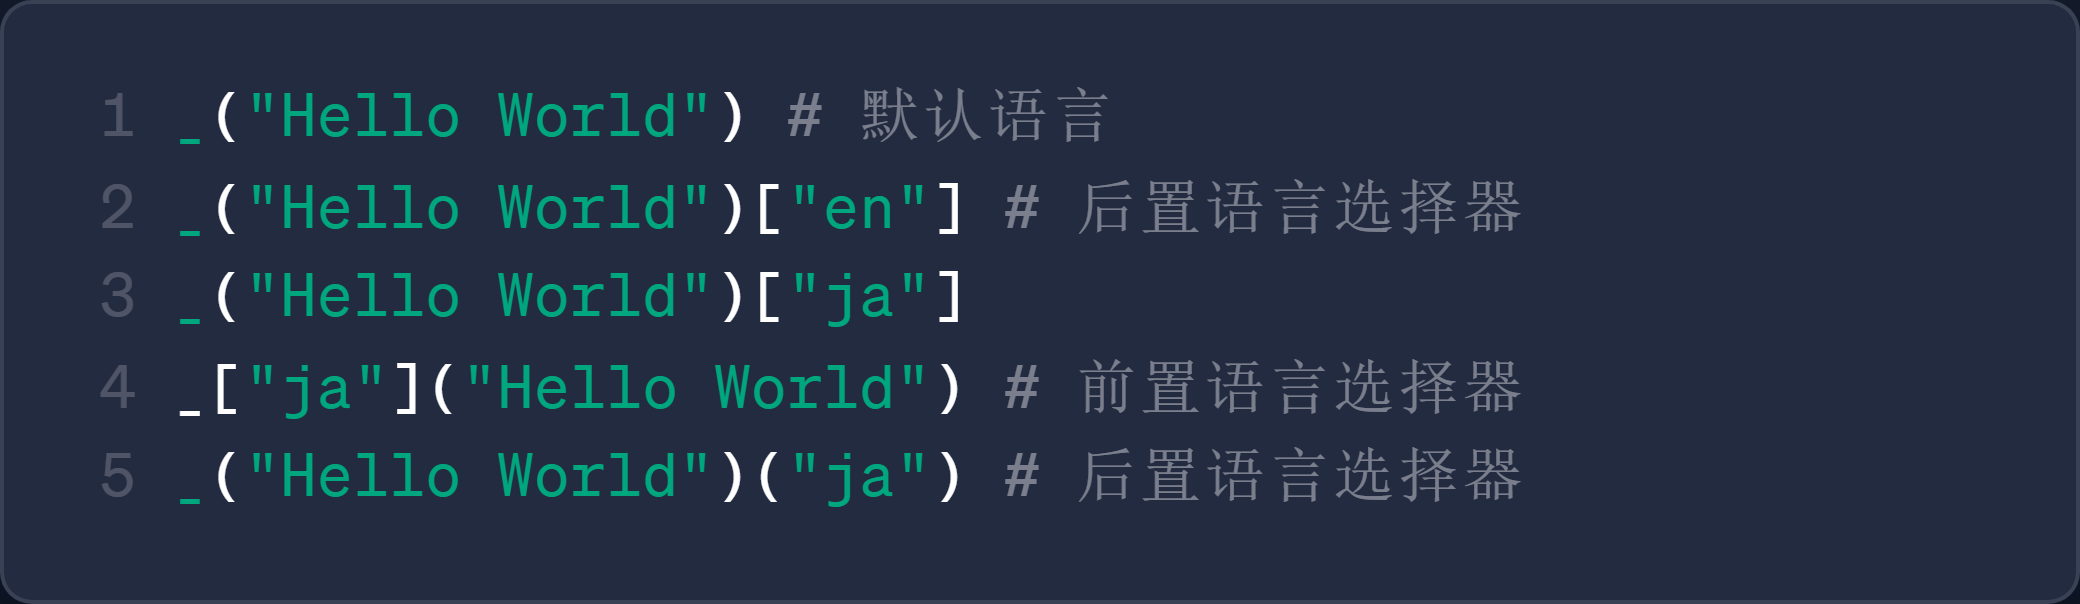 支持默认语言与多语言切换,适配多用户环境 支持默认语言与多语言切换,适配多用户环境 |
👥 多用户多语言场景(如 Telegram Bot )
通过自定义语言选择器, 在多用户环境中实现动态语言选择:
/i18n.py:
from pyrogram.types import Message from easy_ai18n import EasyAI18n, PostLanguageSelector class MyPostLanguageSelector(PostLanguageSelector): def __getitem__(self, msg: Message): lang = msg.from_user.language_code return super().__getitem__(lang) i18n = EasyAI18n() _ = i18n.i18n(post_lang_selector=MyPostLanguageSelector) if __name__ == "__main__": i18n.build(target_lang=['en', 'ru']) /bot.py:
@bot.on_message() async def start(__, msg: Message): await msg.reply(_[msg]("Hello, world!")) 进程已结束,退出代码为 -1073741571 (0xC00000FD) 的退出码 目前的做法是将环境做成了基础镜像,每次交付都基于这个镜像打包。不同版本有增量依赖或版本调整时在 Dockerfile 中单独 pip install ,但这也存在基础镜像管理和基础镜像复现的问题。 ]]>
 ]]>
]]>>>> type({/}) <class 'set'> >>> {/} == set() True 感觉好奇怪的语法,,为啥非要引入一个空 set 语法??有啥特别大的好处吗?? set() 也挺短的啊??
]]>一直请求 403 ,难受,搞不定,用无头 playwrihgt ,又不过 cloudflare ,请求又被拒绝,难搞!
想请教一下 v2 的各位佬,怎么爬这个网站聊天对话。
]]> 让他改个算法代码,把我代码给删错了,导致整个工程出现不可控问题 ]]>
1 、把需要加入的内容保存到 GACode.txt 文件中
2 、执行代码,输入目录即可。(只会修改 html 扩展名的文件)
代码
import os import re import sys from pathlib import Path def get_resource_path(relative_path): """获取资源文件的绝对路径,支持 PyInstaller 打包""" try: # PyInstaller 创建临时文件夹,并将路径存储在_MEIPASS 中 base_path = sys._MEIPASS except Exception: base_path = os.path.abspath(".") return os.path.join(base_path, relative_path) def check_and_add_google_analytics(): """ 检查所有 HTML 文件是否包含 Google Analytics 代码,如果不存在则添加 """ # 初始化统计信息 stats = { 'total': 0, 'modified': 0, 'skipped': 0, 'errors': 0 } # 从 GACode.txt 文件读取 Google Analytics 代码 ga_code_file = get_resource_path('GACode.txt') try: with open(ga_code_file, 'r', encoding='utf-8') as f: ga_code = f.read().strip() except FileNotFoundError: print(f"错误:找不到文件 {ga_code_file}") stats['errors'] = 1 return stats except Exception as e: print(f"错误:读取 GA 代码文件时出错: {str(e)}") stats['errors'] = 1 return stats if not ga_code: print("错误:GA 代码文件为空") stats['errors'] = 1 return stats # 获取当前目录下所有 HTML 文件 html_files = list(Path('.').glob('*.html')) stats['total'] = len(html_files) print(f"找到 {len(html_files)} 个 HTML 文件") for html_file in html_files: print(f"\n 处理文件: {html_file}") try: # 读取文件内容 with open(html_file, 'r', encoding='utf-8') as f: cOntent= f.read() # 检查是否已经包含 Google Analytics 代码 if 'googletagmanager.com/gtag/js' in content: print(f" ✓ {html_file} 已包含 Google Analytics 代码,跳过") stats['skipped'] += 1 continue # 查找</head>标签的位置 head_end_pattern = r'</head>' match = re.search(head_end_pattern, content, re.IGNORECASE) if not match: print(f" ✗ {html_file} 未找到</head>标签,跳过") stats['errors'] += 1 continue # 在</head>标签前插入 Google Analytics 代码 head_end_pos = match.start() new_cOntent= ( content[:head_end_pos] + ' ' + ga_code + '\n' + content[head_end_pos:] ) # 写入修改后的内容 with open(html_file, 'w', encoding='utf-8') as f: f.write(new_content) print(f" ✓ {html_file} 已成功添加 Google Analytics 代码") stats['modified'] += 1 except Exception as e: print(f" ✗ 处理 {html_file} 时出错: {str(e)}") stats['errors'] += 1 print("\n 处理完成!") return stats if __name__ == "__main__": try: # 获取用户输入的目录路径 current_dir = input("请输入要处理的目录路径: ").strip() # 如果用户没有输入,则使用当前目录 if not current_dir: current_dir = os.getcwd() print(f"当前工作目录: {current_dir}") # 切换到指定目录 try: os.chdir(current_dir) except FileNotFoundError: print(f"错误:目录 '{current_dir}' 不存在") input("\n 按回车键退出...") exit(1) except PermissionError: print(f"错误:没有权限访问目录 '{current_dir}'") input("\n 按回车键退出...") exit(1) # 检查是否在包含 HTML 文件的目录中 html_files = list(Path('.').glob('*.html')) if not html_files: print("当前目录下没有找到 HTML 文件,请确保在正确的目录下运行此脚本") input("\n 按回车键退出...") exit(1) # 执行添加 Google Analytics 代码的操作 stats = check_and_add_google_analytics() # 检查返回值是否有效 if stats is None: print("\n⚠ 函数执行异常,无法获取统计信息") stats = {'total': 0, 'modified': 0, 'skipped': 0, 'errors': 1} # 显示统计结果 print("\n=== 执行统计 ===") print(f"总文件数: {stats['total']}") print(f"成功修改: {stats['modified']} 个") print(f"已存在跳过: {stats['skipped']} 个") print(f"处理失败: {stats['errors']} 个") if stats['modified'] > 0: print(f"\n✓ 成功为 {stats['modified']} 个 HTML 文件添加了 Google Analytics 代码!") elif stats['total'] > 0 and stats['skipped'] == stats['total']: print("\n✓ 所有 HTML 文件都已包含 Google Analytics 代码,无需修改。") else: print("\n⚠ 没有成功修改任何文件,请检查文件格式或权限。") print("\n=== 程序执行完成 ===") input("\n 按回车键退出...") except KeyboardInterrupt: print("\n\n 程序被用户中断") input("\n 按回车键退出...") except Exception as e: print(f"\n 程序执行时发生未知错误: {str(e)}") input("\n 按回车键退出...") 我就不发成品了,自行打包哈
]]>
logger ,requests 都属于第三方模块。但是 logger 就是红线。最初以为是环境没识别,但是运行都是正常的,这事情很费解啊。有解决办法么?
咋个没图,贴个地址吧 https://imgur.com/C7tWIvh
]]>今天稍微搜了下,,发现文章中提到的 PEP 727 、PEP 740 并不是文章中描述的内容。。似乎整篇文章都是胡编乱造的。。
搞不懂谁会写这种东西??难道是 AI 生成的??
class X,需要改掉的东西注释写的是y=Union[X, str],实际情况也是两种类型到处都混在一起根本分不清。后面所有跟X类有关的方法一点注释没写,甚至都不做类型判断,而是大量的使用getattr(y, 'name', y)把水搅得更浑(如果y是字符串,没有name,返回字符串本身。否则返回y.name也是一个字符串)。最离谱的是整座屎山还配了一套 30 分钟才能跑完的 pytest 。 现在需要把混乱的y分成确定类型的y和y_str,使用 pydantic 强制定义数据类型来一点点排错。然而改了几百行以后,所有跟X有关的方法都被迫改出两种版本的。pytest 不再报类型错误了,却开始出现各种离奇的 bug 挂掉。
有什么更强大的工具可以搞定这件事吗?比如同步检测两个版本的代码,看从哪一步开始两边的数据变得不一致了?
]]>官方推荐解决方案: 如果在 Django 的请求-响应周期之外的长运行进程中创建了连接,该连接将保持打开状态,直到显式关闭或超时发生。你可以使用 django.db.close_old_connections() 来关闭所有旧的或不可用的连接。
我觉得太 low 了。理论上,只需要设置每次调用 ORM 开始前获取一条连接,调用结束后关闭连接即可解决这个问题。
有没有大佬遇到过这个问题?如何更加优雅的解决?
]]>
问题不是必现的,偶尔就出现一次
问了 AI 给的也是模糊的的回答
连接 pg 数据库用的是 pool = PooledDB()
执行代码如下
def dbQuery(self, sql): cOnn= pool.connection() cur = conn.cursor() cur.execute(sql) result = cur.fetchall() cur.close() conn.close() return result 报错如下:
could not receive data from server: Software caused connection abort (0x00002745/10053) Traceback (most recent call last): File "aaTestV5.py", line 844, in process input_values = self.getInputValuesInfo() File "aa_process.py", line 117, in getInputValuesInfo order_list = super(tf, self).getInputValuesInfo() File "aaTestV5.py", line 555, in getInputValuesInfo results_fromno, no_list = self.getFromnoResult() File "aa_process.py", line 366, in getFromnoResult return self.getFromnoResultInner(False) File "aa_process.py", line 320, in getFromnoResultInner results_fromno, no_list = super(tf, self).getFromnoResult(True) File "aaTestV5.py", line 119, in getFromnoResult result_fromno1 = self.dbQuery(query_sql) File "aa_process.py", line 391, in dbQuery return super(tf, self).dbQuery(sql) File "aaTestV5.py", line 823, in dbQuery cur.execute(sql) File "\python\lib\site-packages\dbutils\steady_db.py", line 598, in tough_method result = method(*args, **kwargs) # try to execute psycopg2.DatabaseError: could not receive data from server: Software caused connection abort (0x00002745/10053) 好像是刚发布的, 没看到有人讨论, 我也是昨天看到的
目前只支持 windows , 但官方产品应该以后会支持 linux, mac 把
官方总算认识到 python 的版本管理是个问题了
]]>import torch import torch.nn as nn import torch.optim as optim from torch.distributed.checkpoint import load_state_dict from torch.hub import load_state_dict_from_url from torch.nn.modules.loss import _Loss from torch.optim import Optimizer from torch.utils.data import Dataset, random_split, DataLoader import torchvision from torchvision.transforms import transforms import torchvision.models as m import matplotlib.pyplot as plt import random import gc # 用于垃圾回收 from torchinfo import summary import numpy as np import random import gc # 设置随机数种子 SEED = 420 random.seed(SEED) np.random.seed(SEED) torch.manual_seed(SEED) torch.cuda.manual_seed(SEED) torch.cuda.manual_seed_all(SEED) torch.backends.cudnn.deterministic = True torch.backends.cudnn.benchmark = False # 设置使用 gpu 还是 cpu 进行训练 device = torch.device('cuda' if torch.cuda.is_available() else 'cpu') # 定义训练的论述 epochs = 100 lr = 0.0001 # 定义数据集需要的参数 batchSize = 64 # 加载训练集需要的数据转换器 trainT = transforms.Compose([ transforms.RandomCrop(28), transforms.RandomRotation(degrees=[-15, 15]), transforms.ToTensor(), transforms.Normalize(mean = [0.4377, 0.4438, 0.4728], std = [0.1980, 0.2010, 0.1970]) ]) # 加载测试集需要的数据转换器 testT = transforms.Compose([ transforms.CenterCrop(28), transforms.ToTensor(), transforms.Normalize(mean = [0.4377, 0.4438, 0.4728], std = [0.1980, 0.2010, 0.1970]) ]) # 加载训练集数据 svhn_train = torchvision.datasets.SVHN(root='C:\\FashionMNIST' , split="train" , download=True , transform=trainT ) # 加载测试集数据 svhn_test = torchvision.datasets.SVHN(root='C:\\FashionMNIST' , split="test" , download=True , transform=testT ) # 定义神经网络,因为我们的图片的尺寸和样本数量都不是很大,所以选择从 ResNet18 和 Vgg16 中抽取层来构建网络 resnet18_ = m.resnet18() class MyResNet(nn.Module): # 这个是基于 ResNet18 构建的网络 def __init__(self): super(MyResNet, self).__init__() self.block1 = nn.Sequential( nn.Conv2d(3, 64, 3, 1, 1), resnet18_.bn1, resnet18_.relu ) self.block2 = resnet18_.layer2 # 连权重都会复用过来,在 resnet18_ = m.resnet18() 这儿就已经初始化好了权重数据! self.block3 = resnet18_.layer3 self.block4 = resnet18_.layer4 # 从 Resnet18 中哪 layer 新增到自己的模型中 self.avgpool = resnet18_.avgpool self.fc = nn.Linear(512, 10, True) def forward(self, x): x = self.block1(x) x = self.block2(x) x = self.block3(x) x = self.block4(x) # 这儿新增一条处理代码 x = self.avgpool(x) x = x.view(-1, 512) return self.fc(x) vgg16_ = m.vgg16() class MyVgg(nn.Module): # 这个是基于 Vgg16 构建的网络 def __init__(self): super(MyVgg, self).__init__() self.features = nn.Sequential( *vgg16_.features[0:9], # 使用*是 将 .features[0:9]提取出来的层,全部取出来,一个个放到当前的 Sequential 中,而不是组成一个 Sequential 放到当前的 Sequential 中! nn.Conv2d(128, 128, 3, 1, 1), nn.ReLU(inplace=True), nn.MaxPool2d(2, 2, padding=0, dilation=1, ceil_mode=False) ) self.avgpool = vgg16_.avgpool self.fc = nn.Sequential( nn.Linear(6272, 4096, True), *vgg16_.classifier[1:6], nn.Linear(4096, 10, True) ) def forward(self, x): x = self.features(x) x = self.avgpool(x) x = x.view(-1, 6272) x = self.fc(x) return x # summary(MyVgg(), input_size=(10, 3, 28, 28)) # 一定要,实例化跑一下,看看有没有问题! class earlyStopping(): def __init__(self, patience=5, tol=0.0005): # 当连续 patience=5 次,本轮次的迭代的损失与历史最小的损失的差值大于 0.0005 这个阈值,就会停止训练 self.patience = patience self.tol = tol self.counter = 0 # 计数器 self.lowest_loss = None # 记录历史最小损失 self.early_stop = False # 需要返回是否需要提前停止 def __call__(self, val_loss): # val_loss 是记录测试集或训练集上一次 epoch 的损失 if self.lowest_loss is None: self.lowest_loss = val_loss elif self.lowest_loss - val_loss > self.tol: self.lowest_loss = val_loss self.counter = 0 elif self.lowest_loss - val_loss < self.tol: self.counter += 1 print('Notice: Early stopping counter {} of {}'.format(self.counter, self.patience)) if self.counter >= self.patience: print('Notice: Early stopping counter Active') self.early_stop = True return self.early_stop # 定义训练函数 def fit(net: nn.Module, lossFunc: _Loss, op: Optimizer, trainData: DataLoader, testData: DataLoader, epochs: int): transLost = [] # 用于收集每轮训练和测试的结果,用于后面画图表使用 trainCorrect = [] testLost = [] testCorrect = [] trainedSampleNum = 0 # 初始化 earlystopping 类 early_stopping = earlyStopping(patience=15, tol=0.00000005) # 初始化测试集的历史最高准确率 test_highest_correct = None test_lowest_loss = None # 获取到整个训练集中的样本数量 trainTotalNum = trainData.dataset.__len__() # 获取到整个测试集中的样本数量 testTotalNum = testData.dataset.__len__() for epoch in range(epochs): net.train() train_loss = 0 train_correct = 0 for batch_index, (data, target) in enumerate(trainData): data = data.to(device, non_blocking=True) target = target.to(device, non_blocking=True).view(data.shape[0]) # 确保标签是 1 维的结构 trainRes = net(data) # 经过学习,这儿每个样本会输出 10 个特征结果对应的数据(如果模型中有 softmax ,就是概率),可以用于后续计算准确率 loss = lossFunc(trainRes, target) op.zero_grad() # 清空优化器上的梯度 loss.backward() op.step() # 开始计算准确数,并累加 yhat = torch.max(trainRes, 1)[1] # 从 trainRes 一个矩阵中,取出每个样本的最大值和最大值所在的索引,得到[1,2,1,4]这种类型的结果 correct_num = torch.sum( yhat == target) # yhat 、target 都是一维张量,使用 == 会挨个对比张量中的元素是否相等,最终得到[False, True, Flase]这样的数据,然后使用 torch.sum 就可以得到一个数字,因为 True 为 1 ,False 为 0 。 train_correct += correct_num # 将准备数累加 # 计算损失,并累加 train_loss += loss.item() # 这儿需要得到所有样本的损失的和 trainedSampleNum += data.shape[0] # print("本批次训练损失为:", loss.item() / data.shape[0]) if (batch_index + 1) % 125 == 0: # 现在进行到了哪个 epoch 、总共要训练多少个样本、已经训练了多少个样本、已训练的样本的百分比 print("Epoch{}:{} / {} = ({:.0f}%)".format( epoch + 1, trainedSampleNum, epochs * len(trainData) * batchSize, 100 * trainedSampleNum / (epochs * len(trainData) * batchSize) )) print("-------------------------------") avg_correct = (float(train_correct) / trainTotalNum) * 100 # print("本轮训练平均准确率:", avg_correct) trainCorrect.append(avg_correct) avg_loss = (float(train_loss) / trainTotalNum) * 100 # print("本轮训练平均损失率:", avg_loss) transLost.append(avg_loss) del data, target, train_loss, train_correct gc.collect() torch.cuda.empty_cache() # 一轮训练结束,就使用测试集进行测试 net.eval() test_loss = 0 test_correct = 0 for batch_index, (test_data, test_target) in enumerate(testData): with torch.no_grad(): test_data = test_data.to(device, non_blocking=True) test_target = test_target.to(device, non_blocking=True).view(test_data.shape[0]) # 确保标签是 1 维的结构 testRes = net(test_data) loss = lossFunc(testRes, test_target) # 计算损失,并累加 test_loss += loss.item() # 计算准备数,并累加 yhat = torch.max(testRes, 1)[1] # 从 trainRes 一个矩阵中,取出每个样本的最大值和最大值所在的索引,得到[1,2,1,4]这种类型的结果 correct_num = torch.sum( yhat == test_target) # yhat 、target 都是一维张量,使用 == 会挨个对比张量中的元素是否相等,最终得到[False, True, Flase]这样的数据,然后使用 torch.sum 就可以得到一个数字,因为 True 为 1 ,False 为 0 。 test_correct += correct_num # 将准备数累加 avg_test_correct = (float(test_correct) / testTotalNum) * 100 # print("本轮测试平均准确率:", avg_test_correct) testCorrect.append(avg_test_correct) avg_test_loss = (float(test_loss) / testTotalNum) * 100 # print("本轮测试平均损失率:", avg_test_loss) testLost.append(avg_test_loss) print("本轮训练平均准确率:{}, 本轮训练平均损失率: {}, 本轮测试平均准确率:{}, 本轮测试平均损失率:{}".format( avg_correct, avg_loss, avg_test_correct, avg_test_loss)) del test_data, test_target, test_loss, test_correct gc.collect() torch.cuda.empty_cache() # 如果测试集损失出现新低或者准确率出现新高,就保存在模型的权重,防止中途断电等原因需要从头再来 if test_highest_correct is None: test_highest_correct = avg_test_correct if test_highest_correct < avg_test_correct: test_highest_correct = avg_test_correct torch.save(net.state_dict(), './v6/model-' + str(epoch + 1) + '.pth') print("model saved") # 最好在测试集上使用提前停止,如果使用训练集无法预测过拟合这种情况 early_stop = early_stopping(avg_test_loss) # 这儿使用提前停止! if early_stop: break print("mission completed") return transLost, trainCorrect, testLost, testCorrect model = MyResNet().to(device) # model.load_state_dict(torch.load("./v4/model-49.pth")) loss_func = nn.CrossEntropyLoss(reduction='sum') # 因为我们在训练函数中,在计算损失的时候是计算的每个样本的损失的和,所以这儿需要使用 reduction='sum' opt = optim.RMSprop(model.parameters(), lr=lr, weight_decay=0.00005, momentum=0.0001) train_data = DataLoader(svhn_train, batch_size=batchSize, shuffle=True, drop_last=False, pin_memory=True) test_data = DataLoader(svhn_test, batch_size=batchSize, shuffle=False, drop_last=False, pin_memory=True) # 开始训练 transLost, trainCorrect, testLost, testCorrect = fit(model, loss_func, opt, train_data, test_data, epochs) # 训练结果可视化 plt.plot(transLost, label='train loss') plt.plot(testLost, label='test loss') plt.plot(trainCorrect, label='train correcct') plt.plot(testCorrect, label='test correcct') plt.xlabel('Epoch') plt.ylabel('CrossEntropy Loss') plt.title('Training Loss') plt.legend() plt.grid(True) plt.show()audio_string = "" for chunk in completion: if chunk.choices: if hasattr(chunk.choices[0].delta, "audio"): try: audio_string += chunk.choices[0].delta.audio["data"] except Exception as e: print(chunk.choices[0].delta.audio["transcript"]) else: print(chunk.usage) wav_bytes = base64.b64decode(audio_string) audio_np = np.frombuffer(wav_bytes, dtype=np.int16) sf.write("audio_assistant_py.wav", audio_np, samplerate=24000) 第 7 、8 行:为什么把 print(chunk.choices[0].delta.audio["transcript"]) 放在 Exception 后面输出?
]]>https://pythonlink.xyz ]]>
会频繁的获取数据,推送数据,对双方的数据进行增删改。
急!!!在线等,,,不甚感谢。
]]>本人 6-7 年产品,今年之前完全没有任何编程的经验,大学学的 c 算全还给老师了,不过早期工作有接触过一些 esxi ,nginx 、mysql 安装配置这些活吧.. 然后今年入职的新公司确实很闲,就用上班摸鱼的时间,用 gemini 撸了一套自用的币价监控的系统.
大概是这样的:
1.前端完全 gemini 生成的,我就把我的需求提给他..按钮位置,色调什么的,复制黏贴,0 编辑;
2.mysql 的库表都是 gemini 给的命令,复制黏贴执行;
3.后端用 python ,各种包接口什么的有报错复制黏贴进去,gemini 给的修改方案,也跑起来了,这个调的久一点,大概用了 3-4 个小时吧,主要有一些和 nginx 配置的奇奇怪怪的问题;
4.监控的 python 通过 Ricky 的定时任务执行,每分钟执行一次,从库里取配置的币种价格,然后通过 cmp 和 gecko (备用)的接口拿的实时数据做比对,满足报警条件就推方糖大佬微信公众号和 tg 的 bot 给我自己。有一些简单的逻辑,比如 24 小时内只报警一次,价格跌落 5%重置预警状态等等..这个第一个版本很快,就是后面换数据源,调整预警逻辑改了好几轮,但是每次都很迅速,2-3 个对话就能解决吧。
5.nginx 的配置,免费的 ssl 证书申请什么的通过 gemini 给的命令和配置处理的,前后大概半个小时吧.
然后这个自用的价格预警监控就跑起来了..前后算起来大概十几个小时吧,上班的时候一边摸鱼一边弄,大概 3.4 天弄完的。
现在给我的感觉就是 AI 现在真的发展太快了…我感觉以后是不是没有初级程序员的空间了?一个中级以上的程序员,通过拆分和描述需求,就能把一些原来事务性的分配给初级程序员的工作给取代了?甚至代码更规范,效率更高..
网站链接就不放了,没有做登录校验啥的。
]]>能想到的一些非常有风险的点:
- 程序员忘了写 await ,单纯靠 cr 很难完全发现,导致阻塞
- python 第三方库没有做 async 改造,不小心用了,导致阻塞
- 有可能本地运行时间短,到了线上数据量大了,阻塞时间变长
问了 ds 和 chatgpt , 看起来都没有很好的解决方案
]]>一个简单的案例,打开文件,然后 json 解析。 go 版本是
func TestA(t *testing.T) { fd, err := os.OpenFile("a.txt", os.O_RDWR, 0666) if err != nil { fmt.Println("打开文件失败", err) } defer fd.Close() var data map[string]string err = json.NewDecoder(fd).Decode(&data) if err != nil { fmt.Println("解析文件失败", err) } fmt.Println(data) } 但是到 python 这边
f = open("a.json") data = json.load(f) f.close() 但是吧
- 如果文件不存在需要处理
- 文件存在,open() 执行异常了要处理
- json.load() 会不会异常?我跳转源码看 josn.load()源码也没看到他会返回哪些异常信息。
所以我写出这种代码
try: with open("a.json", "r") as f: data = json.load(f) except Exception as e: print(e) 但是这样把多种异常合到一个 Exception 了,如果出现异常,你不知道是哪个函数调用出现的异常。所以就需要这样。
try: with open("a.json", "r") as f: try: data = json.load(f) except Exception as e: print(e) except Exception as e: print(e) 然后我发现,最大的问题就是,我每次调用一个外部函数的时候,TMD 根本不知道这个函数会不会异常,总不能每个函数调用都用 try/except 处理一下?
try: f1() except Exception as e: print(e) try: f2() except Exception as e: print(e) try: f3() except Exception as e: print(e) 写 python 给我的感受就是,想写好一个健壮的程序,有很大的心智负担,我总是要考虑我调用的函数会不会有异常。
]]>最近我折腾了一个小应用,想和大家分享,同时也欢迎对 WebAssembly WASM 或前端运行 Python 感兴趣的朋友一起交流。
项目地址: https://github.com/huangsen365/python-wasm-demo
项目背景
在 AI 大潮下,越来越多人多少都会接触到一点编程,Python 又是最容易入门的语言之一。但很多初学者在安装环境这一步就容易被劝退。于是我想到把 Python 运行时搬到浏览器里,省去安装过程,在任何地方都能随时练手。
项目基于 Pyodide ,将 Python 编译成 WebAssembly ,在浏览器端执行。整个应用是纯静态页面,不需要任何后端服务器。只要打开网页,就可以马上写 Python 代码并运行。
体验地址
- 在线 IDE (实时编辑 + 运行): https://python.yunbiyun.com/editor.html
- 模拟 Shell (交互式 REPL ): https://python.yunbiyun.com
特性
- 完全前端运行: 所有代码执行都在浏览器中完成,无需部署后端。
- 基本类 VSCode 的编辑体验: 集成 Monaco Editor ,支持多文件管理和简单的文件系统(页面刷新前保存在内存中)。
- 示例教程: 内置若干 Python 示例文件,适合新手跟着练习。
- 可自定义扩展: 项目源代码开放,欢迎大家 Star 、Fork 、提 Issue 或 PR 。
使用方式
- 打开在线 IDE ,右侧代码区就是编辑器。可以新建文件或打开已有示例文件。
- 点击 "Run" 或在终端内输入
python 文件名.py直接运行,输出会显示在下方终端区域。 - 纯静态部署,自己下载后直接用任何静态服务器(甚至
file://)都能访问。也可以基于 Docker 镜像部署,在 README 中提供了示例。
未来计划
- 增强文件持久化能力,让用户可以选择存到浏览器的 IndexedDB 或下载到本地。
- 支持更多 Python 库的加载,或提供自定义离线包。
- 期待有兴趣的小伙伴一起讨论、完善、写教程等。
项目目前还比较简单,但希望能让更多想入门 Python 或对 WebAssembly WASM 感兴趣的朋友快速体验,欢迎大家提出建议或参与贡献。也欢迎在 V2EX 或仓库 Issues 区讨论,让我们一起探索在浏览器里跑 Python 的更多可能性。
]]>比如:我 Excel 有“📍”,转成 PDF 后,它就消失不见啦~ PDF 里面显示的是空白 ]]>
比如 GraphQL 技术栈, 或者新增 BFF 抽象层等等等等
今天转帖一个比较不同的思路, 基于 pydantic 对象组合 + resolver 获取数据 + post 修改数据三部曲的 Resolver 模式,在避免了手动数据遍历的情况下,完成视图数据的构建。
欢迎大家评论指正, 谢谢!!
]]>我发现 uv 可以下载独立的 Python ,非常感兴趣,因为之前经常使用 Embedded Python 打包东西。Embedded Python 只支持 Windows ,而 uv 支持 Windows/Linux/MacOS 。
同时我又遇见了一个很 amazing 的项目,叫cosmopolitan,它可以将 C/C++编译为一种叫APE的格式的文件,这种神奇的格式同时满足多种文件格式,因此它可以在大多数主流的平台上运行。
受以上两个项目启发,pyfuze 诞生了。它可以将你的 Python 项目打包,使其可以在大多数主流平台上运行。pyfuze 跨平台的逻辑是这样的:
- pyfuze APE 作为启动器,检测当前平台是 Windows 还是 Unix ,下载对应 uv
- uv 下载当前平台的 Python 以及项目依赖
- uv run 运行源代码
项目缺点是需要网络下载东西,不过你可以运行一下再打包,但这样就固定在你运行的平台了。
截至目前,pyfuze 项目已获得 25 颗星,是我获得 star 最多的一个项目。如果你也喜欢这个项目,不妨也点颗⭐:)
P.S. uv 、python 、依赖都是从国外网络环境下载的,如需在国内网络环境下运行,需使用--env 、--uv-install-script-windows 以及--uv-install-script-unix 这三个选项,后两个选项支持使用文件路径。
然后我理解的 ai 代码工具就像汽车上的辅助驾驶功能,本身得会开车,才敢开辅助驾驶,刚学会开车或者不会开车的人是不敢开这个功能的。
所以请教下各种大佬:
我的目的是能够自己驾驭 AI 工具写些生活中的小软件,或者爬虫。不用自己从头到尾写代码,但是能看懂 ai 写的代码,需要怎么样的学习路径。学多深?学哪些教程? ]]>